domenica 7 marzo 2010

Crumble salato

crumble_salato2


"Che cosa hai preparato?" mi hanno chiesto giorni fa. "Un crumble salato" ho risposto. "Che hai detto?" "Un crumble salato" ho ripetuto, "quello con le bricioline croccanti sopra...". "Ah, si ho capito, quello!".
Non tutti in Italia sanno esattamente cosa sia un crumble ma ovviamente non è sempre così, eppure in America e in Inghilterra è un piatto che tutti conoscono. Una cosa simile mi è successa anche in America tanti anni fa. Eravamo a casa di amici che ci hanno chiesto di preparare la pasta, "quella che mangiate in Italia tutti i giorni", mi hanno detto. Mi ricordo i commenti e gli occhi curiosi degli ospiti che ci seguivano in cucina come se stessimo compiendo un'operazione delicatissima, era solo una pasta al sugo!
Qualche anno più tardi, un'amica di Chicago mi ha fatto conoscere la cucina naturale e mi ha portato da Whole Foods Market: non volevo più uscire, è un posto fantastico, se vi capita di andare in America vi consiglio di farci un giro.
Quante novità, per me che venivo dall'Italia! I cibi bio li conosceva già, ma non in quella quantità e varietà. Così ho cominciato a passare da uno scaffale all'altro e a leggere tutte le scritte sulle confezioni per cercare di memorizzare nomi e ingredienti che qui, allora, non avrei trovato facilmente. Era l'occasione giusta per conoscere meglio un nuovo modo di mangiare che, solo da poco, avevo cominciato a sperimentare in Italia, come la cucina vegetariana.
In quel periodo non usavo Internet e ovviamente i food blog non esistevano, quindi, circa 15 anni fa, i viaggi erano l'unico maniera che avessi per avvicinarmi ad abitudini diverse dalla nostra nel mondo della cucina.
Ho apprezzato subito, quando sono arrivata in America e poi anche in Inghilterra, l'atteggiamento aperto e la curiosità che molti americani e inglesi hanno nei confronti delle cucine di altri paesi e questa qualità (io la considero così) l'ho volutamente imparata da loro.
Insomma, mi è sempre piaciuto pensare al cibo come ad un mezzo per conoscere persone nuove ma anche culture e tradizioni diverse dalla nostra e il mio blog è un modo divertente per farlo e per rimanere in contatto con quanti, tra voi, condividono le mie idee.

Canzone del giorno: Why So Blue...

Ingredienti per 4 persone

olio d'oliva
1 cavolo verza, tagliato a strisce sottili
1 tazza di piselli surgelati
2 carote, tagliate a pezzetti
2 porri, tagliati a rondelle
Scaldare l'olio d'oliva in un tegame. Cuocere i porri a fuoco medio fino a farli diventare teneri. Aggiungere le carote e la verza e completarne la cottura.

Crumble

1 1/2 di margarina
30 gr di fiocchi d'avena piccoli
2 cucchiai rasi di farina
1 cucchiaio di parmigiano
2 cucchiai di erba cipollina
In una ciotola, mescolare i fiocchi d'avena, la farina, il parmigiano e l'erba cipollina. Aggiungere la margarina e impastare velocemente gli ingredienti con la punta delle dita. Mettere le verdure in una teglia (20x30cm) e cospargere con il crumble. Cuocere a 200° per 30 minuti.


"What did you prepare?" I was asked by my Italian friends a few days ago. "A savoury crumble" I answered. "What did you say?" "A savoury crumble," I repeated "the one with the little crumbs on top". "Oh, that one!" Not all Italian people know exactly what a crumble is, but it's not always like this, as you can see. A similar thing happened to us in America, many years ago. We were staying at a friend's house and one evening we made pasta with tomato sauce. I remember all the curious eyes following our every move in the kitchen, as if we were performing a delicate operation. Years later a friend from Chicago introduced me to the world of natural food and took me to Whole Foods Market: I couldn't get out of the place; it was amazing!
Everything was a surprise to me. I knew organic food, of course, but not in such a large variety! So, I began to wander through the aisles of the market, grabbing every packet of food in order to memorize names and ingredients and become more familiar with a new way of eating that I had only just started to experiment in Italy, like for example vegetarian cuisine.
I wasn’t using the web then and food blogs didn't exist yet. Thus, about 20 years ago, travelling was my only way to experience different culinary customs.
From the beginning, I appreciated the curiosity and open attitude that some American and English people have towards foreign cuisines. This is a quality that I certainly acquired by following their example.
I've always liked to think of food as a means of meeting new people and learning about different traditions and cultures and my blog is a good way to do it and be in touch with those of you who share my same ideas.

Song of the day: Why So Blue...

Savoury Crumble


Ingredients for 4 people:
olive oil
1 small green cabbage, finely sliced
1 cup frozen peas
2 carrots, cut into pieces
2 leeks, thinly sliced
Heat the olive oil in a frying pan. Add the leeks and carrots and cook until softned. Add the cabbage, cover and continue cooking until the vegetables are tender.


Crumble
1 1/2 Tbs margarine
30gr oats
2 Tbs flour
1 Tbs parmesan cheese
2 Tbs chives
To make the crumble topping, in a small bowl combine flour, cheese, chives and oats. Add the butter and mix until crumbly. Transfer the vegetables to a baking pan, then sprinkle the mixture over them. Cook at 200° for 30 mins.


sabato 13 febbraio 2010

Profiteroles

profiteroles


Le manine sporche di cioccolato che affondano nei bignè e lo sguardo rapito di una principessina dagli occhi blu che chiede il bis, mi hanno convinto a scegliere questo dolce per partecipare al Contest organizzato da Deleciously. I due "grandi" estimatori del mio Profiteroles, sono i figli della mia amica Cristina, che hanno 2 e 9 anni; e' stato proprio gratificante e divertente vedere la loro reazione e poi, considerata la tenera eta' dell'innocenza, non ho messo in dubbio la loro sincerità ;-))
La ricetta della glassa e' tratta da Small Cakes di Roger Pizey; questo libro gira letteralmente in casa mia da un po' di tempo, nel senso che passa da una stanza all'altra insieme a me, lo sfoglio in continuazione, mi piace troppo. L'idea del Profiteroles mi e' venuta proprio guardando la foto del libro; sognavo quella glassa che scivolava lentamente sui bignè, immaginavo il sapore intenso del cioccolato che si scioglie in bocca...Ogni volta che devo preparare un dolce leggo mille ricette e poi cambio idea mille volte, é un duro lavoro! Ma questa volta sono proprio contenta della mia scelta: trovo che questa glassa sia divina, e' dolce e cremosa al punto giusto, finalmente sono riuscita a decorare il dessert senza che il cioccolato colasse ovunque! Spero piacerà anche a voi :-))

Canzone del giorno: Silly Love Songs....

Pasta choux per i bignè dal libro base del Bimby

250gr acqua
1 pizzico di sale
100gr di burro morbido
150gr di farina 00
4 uova (da 60gr)

Mettere nel boccale l'acqua, il sale e il burro, amalgamare: 10 min. 100° vel. 4. Lasciare terminare la cottura ad apparecchio spento per 10 min. Durante i 10 min mescolare l'impasto a vel. 4 almeno 5 volte. Lasciare raffreddare l'impasto nel boccale, poi aggiungere con lame in movimento a vel. 4 le uova una alla volta, lavorando ancora per altri 30-40 sec. vel. 5. Disporre sulla placca del forno, ricoperta di carta forno, delle palline di pasta della dimensione di una noce, ben distanziate fra loro. Cuocere in forno caldo a 180° per 20 minuti circa.

Per chi non ha il Bimby: Portare ad ebollizione l'acqua, il burro e il sale, togliere dal fuoco e versarvi la farina setacciata. Mescolare con un cucchiaio di legno, rimettere sul fuoco e continuare a mescolare fino a che la pasta si stacca dai bordi della pentola. Mettere l'impasto in una ciotola e lasciarlo raffreddare. Aggiungere le uova uno alla volta e mescolare bene per farle amalgamare.

Per disporre i bignè nella teglia ho usato una sac à poche con il beccuccio tondo e li ho cotti il giorno prima di preparare il dolce. Prima di riempirli di crema, per farli tornare croccanti come appena fatti li ho messi nel forno a 100° per qualche minuto.

Salsa al cioccolato dal libro Small cakes di Roger Pizey

200gr di cioccolato fondente
120ml di latte intero
30ml di panna da montare
30gr di zucchero
30gr di burro

Sciogliere il cioccolato a bagnomaria. In un pentolino, scaldare il latte con la panna e lo zucchero e versarli nel cioccolato. Aggiungere il burro e mescolare fino a che si sia sciolto.

Crema pasticcera
3 tuorli
75gr fecola
75gr zucchero
500ml latte
1 baccello di vaniglia o scorza di limone

Lavorare i tuorli con lo zucchero fino ad ottenere un composto cremoso. Unire la fecola setacciata e amalgamare. Versare il latte caldo, aromatizzato con vaniglia o scorza di limone, mescolando con cura. Portare ad ebollizione, su fuoco dolce, sempre mescolando. Abbassare la fiamma al minimo e cuocere per 3 minuti. Versare in una ciotola, cospargere con poco zucchero e lasciare raffreddare.

Con questa ricetta partecipo al contest organizzato da Deleciously.


For Liverpuddlians and English speaking people everywhere …


Profiteroles

The little hands dirtied, covered with chocolate, dipping into the pastry puffs and the ecstatic look of a young blue-eyed young princess waiting for a second helping. This image is what convinced me to choose this dessert as the dish I will enter in the contest organized by Deleciously.
The two "big" fans of my profiteroles, my friend Cristina’s son and daughter, are 2 and 9 years old. It was gratifying and lovely to see their enthusiastic reaction at such an innocent age:))
The recipe of the chocolate sauce is taken from Small Cakes by Roger Pizey. This book has literally been travelling around my house for a while. What I mean is that I like it so much, I am constantly carrying it around with me from room to room, flipping eagerly through the pages.
The idea of making Profiteroles came to mind when I was looking at a picture in the book. I was daydreaming about dripping chocolate sauce over the dessert, imagining the intense flavour of chocolate melting in my mouth.... Everytime that I have to prepare something, I read thousands of recipes and change my mind thousands of times, but...."hard work pays off"! I'm very happy with my choice: I find this ganache is divine, creamy and sweet -it was just right- and am thankful for the fact that I can easily decorate my dessert without dripping chocolate all over the kitchen! I hope you will like it too :-)

Song of the day: Silly Love Songs.....

For the choux pastry I followed the recipe in a basic book of thermomix:

250 gr water
1 pinch of salt
100gr softned butter
150gr flour
4 eggs (60gr each)

Put water, salt and butter in the cup. Program 10 mins, 100° speed 4. Finish cooking with machine off for 10 more mins. In the meantime, mix at speed 4 for at least 5 times. Let cool in the cup. At speed 4, add the eggs, through the lid, one at a time. Mix for another 30/40 sec at speed 5. If you don't have the machine, bring water, salt and butter to a boiling, remove from heat and sift in the flour. Mix well with a wooden spoon, put the pan on the heat again and continue to stir until the dough begins to detach from the side of the pan. Put it in a bowl and let cool. Add the eggs, one at a time, and mix well. Use a piping bag to form small balls of choux pastry (walnut size), leaving some space between them, on a baking tray covered with baking paper. Cook at 180° for 20 mins.

I prepared the Choux pastries a day in advance, then, before filling them, I put them in the oven at 100° for a few minutes to make sure they don’t soften.

For the chocolate sauce:
200gr 70% cocoa dark chocolate
120ml milk
30ml double cream
30gr caster sugar
30gr unsalted butter

Melt the chocolate over a bain-marie. In a separate pan, heat the milk, cream and sugar. Pour the mixture onto the melted chocolate and mix. Slowly wisk in the butter.

Cream custard
3 egg yolks
75 gr potato flour
75 gr sugar
500ml hot milk
1 vanilla bean or lemon rind


Bring milk and the vanilla bean (or lemon rind) to a boil. Let cool slightly. In the meantime, in a saucepan combine egg yolks and sugar and beat until it turns into a pale yellow colour. Remove the vanilla bean or lemon rind from the milk and gradually whisk it into the egg mixture. Cook over very low heat, stirring constantly, until it reaches a slow boil. Lower the flame to a minimum and continue cooking for 3 minutes. Pour the cream in a bowl, sprinkle with a little sugar and let cool.

Fill the choux pastries with cream custard. Then, form a pyramid pouring the chocolate sauce onto each layer in order to keep the pastries stuck together and to coat even the ones in the middle of the dessert.
Put in the fridge and leave it an hour or so to set.


sabato 23 gennaio 2010

Non la solita frittata!

frittata


"Non comprerò più libri di cucina..." ho detto. Infatti, come regalo di Natale me ne sono comprati 4, con foto bellissime e nuove buonissime ricettine. Non dirò che mi sono trovata a passare per caso difronte ai libri di cucina in libreria, perchè non è la verità. Ho proprio deciso di andare alla libreria inglese per arricchire la mia collezione di libri, anche se ormai non so più dove metterli.
"Mai dire mai" continuo a ripetermi, ma credo che dovrei eliminare anche questo proposito ed essere più indulgente, senza pensarci troppo. In realtà mi piace essere incostante, mi piace sorprendermi e anche fare e pensare cose che, fino a poco tempo fa, non consideravo possibili. Mi sento meno noiosa, quasi originale, direi:)) Dopo tutto, cosa c'è di male a cambiare idea? Sono solo 4 libri :-D
Allora, la ricetta di oggi l'ho letta in uno dei nuovi acquisti, un libro molto bello, che si chiama Market Vegetarian di Ross Dobson, il piatto si chiama Tenderstem broccoli and shiitake mushrooms.
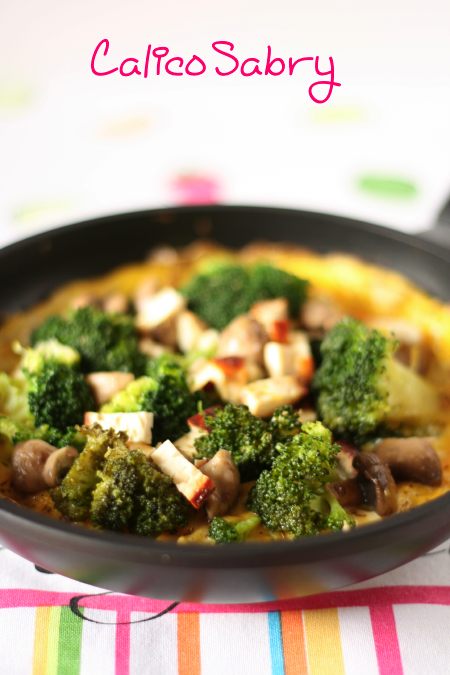
Naturalmente, tanto per non contraddire me stessa, appena ho letto la ricetta ho cambiato subito alcuni ingredienti! Scherzi a parte, il risultato è stato comunque ottimo, non avevo i funghi shiitake e quindi ho usato gli champignons, al posto del tofu la ricotta cotta al forno. Non ho messo le foglie di spinaci freschi e la salsa di soia perchè non sapevo se sarebbe piaciuta agli ospiti. A parte questo, mi attirava soprattutto l'idea delle verdure semplicemente poggiate sull'omelette; è questa l'idea originale che ho preso dal libro.
Visto che tra le mie lettrici più assidue c'è la mia amica Gianna, la ricetta e la canzone del giorno le dedico a lei:))

Canzone del giorno: Good Day Sunshine

Ingredienti

olio d'oliva
4 uova
1 porro, tagliato sottile
una manciata di broccoli
una manciata di funghi
ricotta al forno o tofu tagliato a cubetti
basilico secco e timo

Tagliare i broccoli a cimette. Cuocerli al vapore o lessarli per pochi minuti, devono rimanere leggermente croccanti. In un tegame cuocere i funghi, tagliati spessi, fino a che l'acqua sia evaporata. Condire le verdure con olio e sale. In un altro tegame, (circa 20 cm diam) scaldare un cucchiaio di olio, sistemare le verdure e la ricotta al centro. Nel frattempo battere le uova brevemente e aggiungere il sale e le spezie, versare intorno alle verdure. Con un cucchiaio di legno, muovere il bordo dell'omelette per cuocerla uniformemente. La parte superiore resterà meno cotta. A questo punto mettere l'omelette in un piatto da forno e finire la cottura con la funzione ventilata e il grill. Nel microonde è sufficiente cuocerla per 2/3 minuti a 650+grill. A me piace poco cotta, provate anche voi:))

For Liverpuddlians and English speaking people everywhere …

Broccoli, mushrooms and ricotta omelette


"I'll never buy a cookbook in my life again..." I said. In fact, as a Christmas gift I got myself 4 new cookbooks, with eye-catching photos and amazing recipes. I won't say that I found myself hanging around a cookbook section by accident, because it's not the case. I planned to go to the English bookshop with a strong intention of filling my cramped bookshelf.
"Never say never" I keep on saying to myself, but I guess I should eliminate even this purpose from my life and simply be more self-indulgent. After all I like my being incostant, I like surprising myself and do and think things that, .until recently, I didn't even consider possible. I feel less tedious and more original;)) After all, what's wrong with changing minds? It's just a few more books :-D
Well, for this dish I read the recipe contained in the beautiful book Market Vegetarian by Ross Dobson called Tenderstem broccoli and shiitake omelette.
Of course, as I never go against my nature, as soon as I chose it I changed some of the ingredients! Jokes apart, the result was very good the same, I din't have shiitake mushrooms so I used the champignons, instead of tofu I put some oven cooked ricotta cheese. I omitted baby spinach leaves an soy sauce because I wasn't sure whether my guest would have liked it. Apart from this I like the idea of the vegetables strewn on top of the omelette, that is the original idea for me and that I certainly took it from the book.

Ingredients for 4:
olive oil
4 eggs
1 leek, thinly sliced
a handful of broccoli
a handful of champignons mushrooms, cut in quarters
oven cooked ricotta or tofu, cubed
dried basil or thyme

Cut the broccoli into florets, steam them or boil them for a few minutes until they are tender but still crisp. In a pan cook the mushrooms until water has evaporeted. Season the vegetables with oil and salt. In another pan, (about 25 cm diameter) heat 1 Tbs olive oil. Arrange the vegetables and cheese in the middle of the pan, in the meantime beat the eggs, add salt, basil, thyme then pour around the broccoli and the mushrooms. With a wooden spoon, move the edge of the omelette towards the center of pan so the egg mixture can cook evenly. The top will remain uncooked. At that point place the omelette in an oven proof dish and grill it for a few minutes. I finished cooking it in the microwave oven, I set the oven on the microwave (650W) and grill function for 2/3 mins. If you like, you can leave the top a bit moist.

venerdì 15 gennaio 2010

Le pizzette

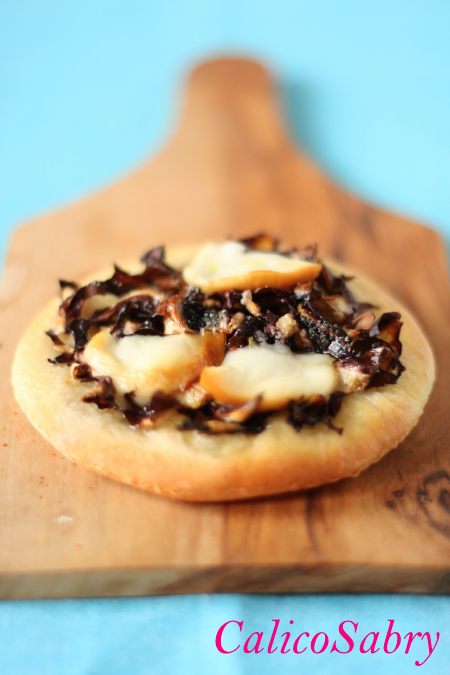
pizzetta_al_radicchio


Questo post lo dedico ai miei fantastici nipoti, i due più giovani buongustai della famiglia.
La pizza e il pane sono le ricette che ripeto più spesso, ma le pizzette hanno fatto la loro comparsa a casa mia in un'occasione indimenticabile. Mi ricordo che Iaia, ogni volta che andavo a trovarla, invece di salutarmi appena arrivavo a casa sua, pronunciava la fatidica frase: "Giochi alla cucina?"
Quindi, un giorno, dopo tanta teoria, ho deciso di passare ai fatti e l'ho invitata a casa mia per provare le pizzette. Lei aveva circa 5 anni e non vedeva l'ora di mettersi all'opera. Dunque l'abbiamo aiutata ad indossare il suo grembiule, io il mio, dopodichè ho diviso la pasta lievitata in tante piccole porzioni e le ho fatto vedere come stendere le pizzette. Poi, quando è arrivato il suo turno, le ho dato il mattarello piccolo comprato apposta per lei. Vedendo quello scricciolo pieno di entusiasmo, zii, nonni e genitori, ma questo lei non se lo ricorderà, hanno cominciato a ridacchiare divertiti alle sue spalle. Ma come si sa, i bambini riservano sempre grandi sorprese, infatti Iaia ha preso il suo mattarello e sotto il nostro sguardo esterrefatto, ha steso, con grande maestria, delle pizzette perfette, lasciandoci senza parole. Con delicatezza le ha messe, una per una, sulla carta da forno e con il cucchiaino ha versato la salsa di pomodoro con precisione chirurgica. Prima di andar via le ho chiesto (si fa per dire:)) se volesse portarne qualcuna a casa per la cena, le ho dato una scatola e lei l'ha riempita, spingendo con le sue manine, le pizzette all'interno per farcene entrare il maggior numero possibile!! :-D
Il fratellino era ancora troppo piccolo per mangiare con noi ma ha recuperato terreno in fretta perchè invitarlo a pranzo è un un vero piacere; i complimenti, degni di un piccolo gentleman, per i miei piatti sono assicurati. Last but not least, lui è un vero appassionato di musica, quando la scorsa settimana ho trovato una maglietta dei Beatles per lui ha gridato: "Si, la voglio!!" Dunque la Canzone del giorno la dedico a lui:))

Canzone del giorno: All together now.....


For Liverpuddlians and English speaking people everywhere …


I dedicate this post to my niece and nephew, the youngest goumet of the family. Pizza and bread are the recipes that I like to repeat most often, but pizzette (Italian for small pizzas) first made their appearence in my house on a special occasion. I remember that Iaia, every time I went to visit her, instead of saying hello when I arrived at her house, she would greet me with an immediate: "Can we play with my kitchen?" So, one day, after so much pretend, I decided it was time to take her to the real kitchen and I invited her to my house to try Pizzette. She was then about 5 years old and couldn't wait to get started. Well, we helped her to put on her apron, I put on mine too, then I divided the dough into small portions and I showed her how to roll it out. When her turn arrived I gave her the small rolling pin I had bought just for her. Seeing that little girl so happy to learn, uncles, grandparents and parents, although she won't remember this, began to giggle on her back. But as we know, children are full of surprises, in fact Iaia took her rolling pin and before our very eyes, rolled out some perfect pizzette, leaving us lost for words. She gently put them, one at a time, on the baking paper and with a teaspoon she put the sauce on top of them showing great skill. Before she left I asked her if she would like to bring some home for dinner, so I gave her a box and she filled it up, pressing down with her little hands, hoping to fit in as many as possible.
Her little brother was to young to eat with us but he soon gcaught to us and inviting hom for lunch is a pleasure; compliments to my dishes, like only a gentleman would do, are guaranteed. Last but not least, he loves music; last week when I found Beatles tshirt for him he shouted: "Yes! I want it!" So the song of the day is dedicated to him:))

Song of the day: All together Now......

Ingredienti:
500gr di farina manitoba
1 cubetto di lievito di birra
300ml circa di acqua tiepida
1 cucchiaio raso di sale
1 cucchiaio raso di zucchero

Sciogliere il lievito nell'acqua con lo zucchero. Aggiungere la farina e in ultimo il sale. Lavorare l'impasto e formare una pasta soffice che si stacchi dalle dita. Se necessario aggiungere uno o due cucchiai di acqua. Mettere la pasta in una ciotola e coprirla bene con la pellicola. Lasciare lievitare finchè non sia raddoppiata (in genere, d'inverno la metto vicino al termosifone). Stendere la pasta, ritagliare dei dischetti, disporli sulla carta da forno e quindi in un due teglie. Lasciare lievitare nuovamente la pizzette nel forno a 25°, per circa mezz'ora. Toglierle dal forno e alzare la temperatura a 200°. Dopo 10 minuti, quando il forno avrà raggiunto la temperatura cuocere le pizzette per circa 15 minuti a 200°


Ingredients:
500gr Manitoba flour
25gr fresh yeast
300ml warm water
1 Tbs sugar
1 Tbs salt

Melt yeast and sugar in warm water. Add flour and begin to work the ingredients. Add salt and continue to knead the dough to form a ball. Put in a bowl and cover loosely with cling film. Leave in a warm place or by the heater until the dough has doubled in size. Roll out the dough and using a round cutter (about 8cm) cut out the small pizzas. Place them on a baking tray covered with baking paper and put them in oven at 25 degrees for half an hour to let them rise again. Remove from oven and set temperature at 200 degrees. After 10 mins, when oven has reached temperature, cook your pizzette for 15 mins.

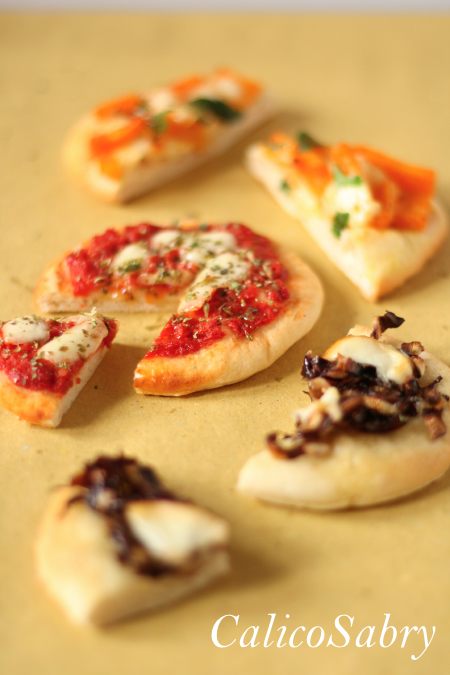
Per la pizza con il radicchio e la scamorza, taglio a striscioline il radicchio e lo metto subito sulla pizza senza cuocerlo. A fine cottura aggiungo un pò d'olio d'oliva e la scamorza affumicata.

For the pizza with radicchio and smoked scamorza, I cut radicchio into thin strips and put right away on pizza without cooking it. Towards the end of cooking time I season with oil and salt and put sliced scamorza.

pizzetta_con_la_zucca


La mia preferita: avevo un pò di zucca butternut ed ho pensato di provarla sulla pizza: buonissima! L'ho cotta precedentemente con olio e aglio, sulla pizza ho aggiunto la paprika, la rucola e a fine cottura la mozzarella.

My favourite: I had some butternut squash and I thought I could try it on my pizza: delicious! I previously cooked it with oil and garlic, then I garnished with paprika, arugula and mozzarella cheese.

pizzetta_margherita


Per la margherita preparo un sughetto con la polpa di pomodoro, aglio e olio e origano. Non usa la passata perchè troppo liquida. Anche qui aggiungo la mozzarella solo verso la fine della cottura, dopo circa 13 minuti.

For the "pizza margherita", in a pan heat 1 clove garlic in 450gr tomato sauce. Cook for 10 mins, add salt and a lot of oregano. I don't normally use tomato purè because it's too liquidy and the dough wouldn't well in my oven. Even here, I add mozzarella cheese at the end of cooking time, after 13 mins.


pizzette_varie


sabato 26 dicembre 2009

Biscotti glassati

biscotti_glassati1


E' andato tutto bene, troppo bene....
Siamo tornati da Parigi il 12 Dicembre, dopo 4 giorni fantastici, in compagnia dei nostri carissimi amici, tutti fans dei Beatles, con i quali abbiamo condiviso 2 ore e 50 minuti di magia.
Alle 18 del 10 Dicembre abbiamo preso la metro tutti insieme e siamo arrivati allo stadio di Bercy per il concerto di Paul McCartney.


For Liverpuddlians and English speaking people everywhere …


Everything went well, too well....
We came back from Paris on 12th December, after 4 days, spent in the company of my dearest friends, all of them Beatles Fans of course, with whom I shared 2 hours and 50 minutes of magic.
At 6pm of 10th December we took the Underground and reached the Bercy Stadium to see the concert of Paul McCartney.


biglietti_bercy

Appena entrate, come da copione, si fa subito la fila per acquistare la T-shirt, la sciarpa e tutto quello che "serve".

As soon as we were in, according to "plan", we queued to buy a T-shirt, a scarf and all that's "needed".

tshirt_bercy

sciarpa_bercy

Il concerto è iniziato poco dopo le 21 ed è stato bellissimo, avremmo voluto che non finisse mai...da quel giorno non si parla d'altro pur di rivivere quei momenti:))
Con Pat e Manu facciamo sempre il possibile pur di farci notare e anche questa volta ci siamo riuscite: gli è piaciuto lo striscione con un cuore gigante che ha portato Manu e alla fine di And I love Her, quando finalmente lo ha visto, ci ha salutato e ha battuto la mano sul suo cuore per tre volte, forse perchè siamo in tre?? :-D
Tutto questo mentre mia madre, al telefono da Roma ascoltava in diretta la canzone, così ha sentito anche le grida di gioia!
L'altro momento da ricordare: "Mrs Vanderbilt" e "Ob-la-di, Ob-la-da" che abbiamo ascoltato dal vivo per la prima volta, divertenti e trascinanti, la prima indimenticabile.
Alla fine del concerto, dopo 2 bis, (è sempre molto generoso con il pubblico:)) Paul è andato via sotto una pioggia di coriandoli che poi si raccolgono e si conservano, per sempre.

The concert began around 9pm and was simply beautiful, amazing...we wished it would never end...since that day we can't stop talking about it as if to go back in time and live those moments again...we had so much fun, we laughed, we cried, we sang along with every song...
With Pat and Manu, we always do our best to be noticed by Paul and even this time we reached our goal: he liked the big poster that Manu draw, with a big red heart on it and at the end of And I love her, when he finally saw us, he wawed to us and touched his heart three times, maybe because there were three of us? :-D
All this, while my mother listening to the song by my cell phone from Rome, so she could hear us screaming with joy!
Something special to remember: "Mrs Vanderbilt" and "Ob-la-di, Ob-la-da" which we listened live for the first time, amusing and enthralling the first one, unforgettable the second.
At the end of the concert, after 2 encores, (he is very generous with his fans):)) Paul went away under a white and silver confetti rain and of course we gathered some and kept them for good.


vittoria_alata1

Parigi è meravigliosa, la cornice perfetta per la nostra avventura, il paradiso per gli amanti del cibo e per tutti i food bloggers, per gli appassionati di arte e cultura.
Grazie Floriana per aver partecipato alla grande emozione di fronte alla Nike di Samotracia, è stato bello poter condividere quel momento con una vera conoscitrice della storia dell'arte. Anche se eri lontana fisicamente sono certa che per un istante tu, con il pensiero, abbia visto con me la Nike, quanto mi piacerebbe visitare il Louvre con te e sentirti parlare del mondo antico! Una vera lezione di storia dell'arte, che ne dici? Si può fare? :))


Paris is just wonderful, the perfect frame for our adventure, heaven to food lovers and foodbloggers, the ideal place for those who have a passion for history and art.
Thank you Floriana for taking part in the emotion I felt when I saw the Nike. It was nice to share that moment with someone who has such a profound knowledge of the history of art. Even if you were distant phisically I'm sure that for a moment , with your mind, you saw the Nike with me. How I wish I could have heard your words about what we saw at the Louvre Museum! A proper lesson in art, what do you think?

Durante le nostre passeggiate parigine non ci siamo fatti mancare le soste da Pierre Hermé: la prima con Giuggi il martedì, appena arrivati. La seconda con Pat e Manu: macarons al tartufo bianco (!) e ai marroni.
Sosta n. 2: Ladurée. Di nuovo macarons, quello al cioccolato è insuperabile. Poi ho assaggiato i Cannelés ed è stato amore al primo morso! Prima di partire ho comprato una piccola confezione di Sablées, la mia passione sono i biscotti e quelli di Ladurée si devono gustare in silenzio, cercando di non dimenticare quel sapore sublime nella speranza di trovare un giorno, da qualche parte, una ricetta che assomigli all'originale francese. W Ladurée!!!
Un pranzo delizioso, seguendo le indicazioni delle altre bloggers: Rose Bakery, una zuppa alla zucca e funghi buonissima, l'ambiente è accogliente, per me l'ideale.
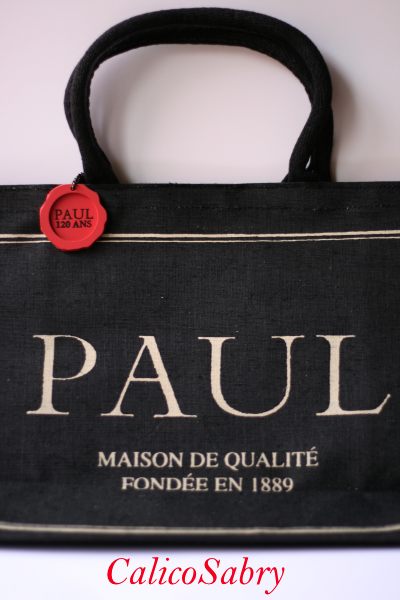
Ma quello più divertente è stato il pranzo da Paul, lì abbiamo comprato anche la borsa:))


borsa_paul

I biscotti


biscotti_glassati2

Per quanto riguarda la ricetta di oggi, ecco il Fleur de Sel comprato proprio per fare i biscotti.

As for the recipe of today, this is the Fleur de Sel that I bought just to make biscuits.

fleur_de_sel

Non saranno quelli di Ladurée ma penso di potermi accontentare. Hanno avuto grande successo a casa e considerato il mio forte senso critico, sono piaciuti anche a me :)) Li ho fatti anche senza glassa oppure usando solo farina e amido di mais, cioè 180gr di farina e 70 di amido. L'impasto alla fine non era liscio ma piuttosto umido, tuttavia ho evitato di aggiungere altra farina e ho aspettato 2 ore prima di stenderlo. A quel punto era già più asciutto e poi, usando il foglio di Silpat, ho usato poca farina e ho steso piccole quantità di pasta, ritagliando solo 3 biscotti alla volta.

Ingredienti:

200 gr di farina
30 gr cocco
20 gr di mandorle in polvere
100 gr burro
100 gr zucchero
2 cucchiaini rasi di lievito
1 uovo
1/2 cucchiaino di Fleur de Sel

Tostare le mandorle in un tegamino antiaderente, mescolarle spesso fino a che diventino di colore dorato.
Setacciare la farina e il lievito, aggiungere il cocco e le mandorle e il sale. Impastare la farina con il burro, aggiungere l'uovo e lo zucchero. Lavorare tutti gli ingredienti e formare una pasta che avvolgerete nella pellicola trasparente. Dopo almeno 2 ore stendere la pasta (1/2 cm) e ritagliare le stelline. Cuocere a 160 ° per 12 minuti, girando la teglia a metà cottura. Lasciare raffreddare i biscotti prima di stendere la glassa.

Glassa

200 gr di zucchero a velo
acqua o succo di limone

Ho mescolato qualche cucchiaio di acqua e succo di limone con lo zucchero, fino ad ottenere una glassa piuttosto densa. Non ho seguito una ricetta precisa ma ho cercato di prepararne poca alla volta quindi non ho usato subito tutto lo zucchero. La glassa deve avere la giusta densità perchè altrimenti cola mentre la stendete. Basta provare con un biscotto, se necessario aggiungete altro zucchero o acqua. Ultima cosa, per stendere la glassa sui bordi ho usato la punta di un coltello.

Sugar cookies

They are not exactly like the Ladurée biscuits (I love their Sablés!) but even with my strong sense of self-criticis I can say that I liked them. I made them even without icing or with just flour and cornflour, 170gr flour and 70gr cornflour. The dough was not smooth and it was moist, however I avoided adding more flour, I put it in the fridge for 2 hours. At that point it was drier, therefore, with the help of a Silpat baking sheet, it was easy to roll it out.


Ingredients:
200gr flour
30gr coconut
20gr powdered almond
100gr butter
100gr sugar
2 tsp baking powder
1 egg
1/2 tsp Fleur de Sel

In a non stick pan, toast the almonds until golden. Put the coconut in a coffee grinder and process until the flakes are powdered; nut oil will be released by grinding so coconut will be creamy. This will help the kneading and the edges of biscuits to be smooth. Sift flour and baking powder, add coconut, almond and salt. Work the flour with butter, add the egg and sugar. Knead together all the ingredients to form a ball, wrap it with cling film and refrigerate for at least 2 hours. Roll out the dough, about 1/2 cm thick and cut out the biscuits using a 5 cm star-shaped cutter. Cook at 160 for 12 mins, turn the baking tray for even cooking.

Icing
200gr powdered sugar
water or lemon juice

I mixed sugar with some Tbs of water and lemon juice, then I stirred until smooth and rather thick. I didn't follow a precise recipe but just add more liquid when necessary. As I said I like the mixture to be thick because it doesn't drip off.
When the biscuits are cold, use a teaspoon to spread the icing and a knife along the edges. Cool on a rack.